ESP32 Integration
Real-time location data reception and parsing using the lec & lep commands.
In This Guide
we will walk you through the process of connecting a GrowSpace Developer Tag to an Arduino ESP32 board, and receiving and parsing real-time location data using the lec and lep commands. This step-by-step guide is designed to be beginner-friendly, even for those new to connecting ESP32 with tags. Unlike the UNO, the ESP32 supports multiple hardware serials, making it an ideal board for building compact test environments.
Required Materials
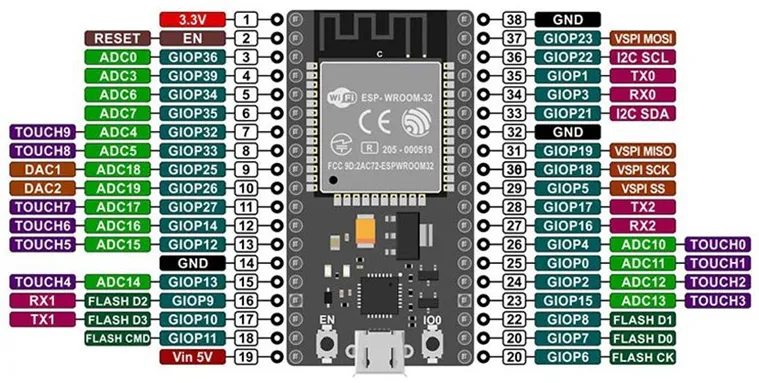
ESP32 Board (e.g. DevKitC)
For serial data reception and parsing
GrowSpace Developer Tag
Location Data Transmitting Device
Arduino IDE
Code Writing and Upload
Jumper Cables (4-pin)
For connecting TX, RX, GND, 3.3V
Arduino IDE Setup
Installation
Download the installation file from the official Arduino IDE website. https://www.arduino.cc/en/software
For Windows users, it is recommended to use the
.msi
installer.
Add ESP32 Board
Launch the Arduino IDE. →
File > Preferences

In the Preferences window, add the following URL in the Additional Boards Manager URLs field:
https://raw.githubusercontent.com/espressif/arduino-esp32/gh-pages/package_esp32_index.json

Tools > Board > Board Manager
→ Search for ESP32 and click Install for the ESP32 by Espressif Systems package.

After installation, go to
Tools
>
Board
>
ESP32 Dev Module
Go to
Tools
>
Port
and select the automatically detected port for the ESP32.

Serial Connection Setup
The left connector of the GrowSpace Developer Tag supports 3.3V serial communication. Connect the TX and RX pins of the tag to the TX2/RX2 pins on the ESP32 board as follows:
TX
GPIO 16 (RX2)
RX
GPIO 17 (TX2)
GND
GND
3.3V
3.3V
⚠️ TX ↔ RX must be connected crossed (TX to RX and RX to TX). Example:
TX
→ ESP32 RX,RX
→ ESP32 TX

Here is the pinout for the ESP32 DevKit. Please locate the TX2 and RX2 pins and make sure to connect them accurately as follows:

Serial Relay Example Code
This code allows the ESP32 to relay serial data between a PC and a GrowSpace Developer Tag.
#define SERIAL2_RX 16
#define SERIAL2_TX 17
String inputFromSerial = "";
String inputFromSerial2 = "";
void setup() {
Serial.begin(115200);
Serial2.begin(115200, SERIAL_8N1, SERIAL2_RX, SERIAL2_TX);
Serial.println("ESP32 Serial <-> Serial2 Relay Start");
}
void loop() {
// Serial0 Input → Transmit to Serial2
while (Serial.available()) {
char ch = Serial.read();
if (ch != '\n') inputFromSerial += ch;
if (ch == '\n') {
Serial2.print(inputFromSerial);
Serial2.print('\r');
inputFromSerial = "";
}
}
// Seria12 Input → Transmit to Serial0
while (Serial2.available()) {
char ch = Serial2.read();
inputFromSerial2 += ch;
if (ch == '\n') {
Serial.print("[Serial2 → Serial] Reception: ");
Serial.print(inputFromSerial2);
inputFromSerial2 = "";
}
}
}
Serial Monitor Setup: Set baud rate to 115200 bps and enable newline transmission.
If the device information appears after entering the
si
command, the connection is successful.
Example: Parsing Location Data (lep / lec commands)
A developer tag returns current location data using the lep
or lec
command.
The example below shows how to parse the response and display it in a readable format.
Code Structure
#define SERIAL2_RX 16
#define SERIAL2_TX 17
String inputFromSerial = "";
String inputFromSerial2 = "";
void setup() {
Serial.begin(115200);
Serial2.begin(115200, SERIAL_8N1, SERIAL2_RX, SERIAL2_TX);
Serial.println("ESP32 Serial <-> Serial2 (\n Start parsing anchor data)");
}
void loop() {
while (Serial.available()) {
char ch = Serial.read();
if (ch != '\n') inputFromSerial += ch;
if (ch == '\n') {
Serial2.print(inputFromSerial);
Serial2.print('\r');
inputFromSerial = "";
}
}
while (Serial2.available()) {
char ch = Serial2.read();
inputFromSerial2 += ch;
if (ch == '\n') {
inputFromSerial2.trim();
if (inputFromSerial2.startsWith("POS,")) parseLEP(inputFromSerial2);
else if (inputFromSerial2.startsWith("DIST,")) parseLEC(inputFromSerial2);
else Serial.println(inputFromSerial2);
inputFromSerial2 = "";
}
}
}
Parse response from lep
command (tag location data)
lep
command (tag location data)void parseLEP(String line) {
Serial.println("[LEP location result]");
int idx = 0;
String parts[5];
while (line.length() > 0 && idx < 5) {
int comma = line.indexOf(',');
if (comma == -1) {
parts[idx++] = line;
break;
}
parts[idx++] = line.substring(0, comma);
line = line.substring(comma + 1);
}
Serial.print("X: "); Serial.println(parts[1]);
Serial.print("Y: "); Serial.println(parts[2]);
Serial.print("Z: "); Serial.println(parts[3]);
Serial.print("Quality(QF): "); Serial.println(parts[4]);
Serial.println();
}
Parse response from lec
command (ranging + location data)
lec
command (ranging + location data)void parseLEC(String line) {
Serial.println("[LEC ranging + location result]");
int posIndex = line.indexOf("POS,");
if (posIndex == -1) {
Serial.println("→ No location data");
return;
}
String distPart = line.substring(0, posIndex - 1);
String posPart = line.substring(posIndex);
int anchorIdx = 0;
int anStart = 0;
while ((anStart = distPart.indexOf("AN", anStart)) != -1) {
int idStart = anStart + 2;
int idEnd = distPart.indexOf(",", idStart);
String id = distPart.substring(idStart, idEnd);
int valStart = idEnd + 1;
float x = distPart.substring(valStart, distPart.indexOf(",", valStart)).toFloat();
valStart = distPart.indexOf(",", valStart) + 1;
float y = distPart.substring(valStart, distPart.indexOf(",", valStart)).toFloat();
valStart = distPart.indexOf(",", valStart) + 1;
float z = distPart.substring(valStart, distPart.indexOf(",", valStart)).toFloat();
valStart = distPart.indexOf(",", valStart) + 1;
float d = distPart.substring(valStart, distPart.indexOf(",", valStart)).toFloat();
Serial.print("AN"); Serial.print(anchorIdx++); Serial.print(" (ID "); Serial.print(id); Serial.print("): ");
Serial.print("x="); Serial.print(x);
Serial.print(", y="); Serial.print(y);
Serial.print(", z="); Serial.print(z);
Serial.print(" → Distance: "); Serial.print(d); Serial.println("m");
anStart = valStart;
}
Serial.println("▶ Tag location:");
parseLEP(posPart);
}
Test Method Summary
Upload the code and open the Serial Monitor in the Arduino IDE.
Enter the
lep
orlec
command.Check if the location data is displayed correctly (e.g., XYZ coordinates, distance).
Conclusion
In this manual, we showed how to connect the GrowSpace developer tag to an ESP32, send location commands via serial communication, and receive and parse the data. This process allows real-time location tracking of a single tag, and can be extended to experiments using BLE transmission, Wi-Fi integration, or MQTT communication. If you don’t see any response during testing, please double-check the TX/RX pin connections and your serial port settings.
Last updated